Difference between revisions of "HiSeq2000 - Tear Down"
From Hackteria Wiki
Qee184368216 (talk | contribs) m |
Qee184368216 (talk | contribs) m |
||
| Line 4: | Line 4: | ||
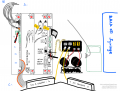
* 2 For the front view of the syringes(A) and the fridge(B), | * 2 For the front view of the syringes(A) and the fridge(B), | ||
* 3 For the left side view, | * 3 For the left side view, | ||
| − | * 4 For the front view of the optical bench(C). [[File:HardwareInterconnections01.png| | + | * 4 For the front view of the optical bench(C). [[File:|thumb]] |
| + | <gallery> | ||
| + | Hiseq Visual Aid.PNG|HiSeq Overview | ||
| + | HardwareInterconnections01.png|HiSeq Overview | ||
| + | </gallery> | ||
| + | |||
| + | --<For detailed diagrams, refer to the PDF file at the bottom of this page>-- | ||
<gallery> | <gallery> | ||
Revision as of 01:00, 13 February 2019
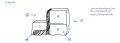
The overall look of HiSeq2000:
- 1 For the right side view,
- 2 For the front view of the syringes(A) and the fridge(B),
- 3 For the left side view,
- 4 For the front view of the optical bench(C). [[File:|thumb]]
- Hiseq Visual Aid.PNG
HiSeq Overview
HiSeq Overview
--<For detailed diagrams, refer to the PDF file at the bottom of this page>--
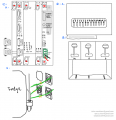
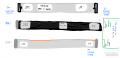
Sockets: 1 & 2
Sockets: 3
Sockets: 4


- Wires: 1
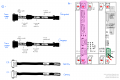
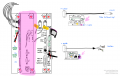
Camera & Frame Grabber
PE Prime


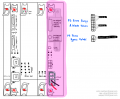
- Wires: 3
MainBoard Socket
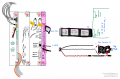
MainBoard Wires
MainBoard Wires


Parker_XY-Stage Board
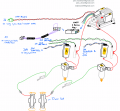
Parker_XY-Stage Wires


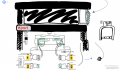
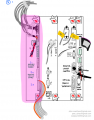
Laser & Camera
Docking Stage & Sensors


Full Version PDF: File:Illumina HiSeq2000 TearDown 03.12.2018.pdf