Difference between revisions of "DIY Microscopy Instruction (Japanese)"
From Hackteria Wiki
(→3. 照明) |
(→3. 照明) |
||
| Line 104: | Line 104: | ||
* 顕微鏡工作のために使ったウェブカメラにLEDが付いていない場合でも照明は簡単に付け足せる。 | * 顕微鏡工作のために使ったウェブカメラにLEDが付いていない場合でも照明は簡単に付け足せる。 | ||
| − | * | + | * LEDに銅線をつなげる。はんだで取り付ける方が安全。In this easy way, the wires can be twisted together. But it is safer if they are solded on. |
* The centimeters long feed of our light source is wrapped with garden wire. The wire thus becomes pliable and later can be attached in any position. | * The centimeters long feed of our light source is wrapped with garden wire. The wire thus becomes pliable and later can be attached in any position. | ||
* The light source, potentiometer and battery are attached to our construction with hot glue. Our DIY MICROSCOPE is ready for use. | * The light source, potentiometer and battery are attached to our construction with hot glue. Our DIY MICROSCOPE is ready for use. | ||
Revision as of 15:55, 28 December 2015
Contents
Instructions to be translated
[[File:hackteria-mikroskop-2012-137.JPG|right|400px|thumb|The Chapter about the DIY microscope can be downloaded here and available now with Chinese translation included!
Would be great to have this also in other languages, below is the english original to get you started.
Translations
DIY Mikroskop Anleitung (Deutsch)
DIY Microscopy Instruction (Chinese)
DIY Microscopy Instruction (Spanish)
DIY Microscopy Instruction (Bahasa Indonesia)
DIY Microscopy Instruction (French)
DIY Microscopy Instruction (Japanese)
0. はじめに
ハクテリアのDIY顕微鏡工作のコンセプトは誰にでもできる市販のウェブカメラの改造です。ウェブカメラのエレクトロニクスはノータッチで、レンズの位置を変えるだけ。その上に、安定したスタンドを作り、LEDライトでサンプルを照明します。
DIY顕微鏡製作三段階
- ウェブカメラの改造
- スタンド作り
- 発行ダイオード light-emitting diode (LED)の照明
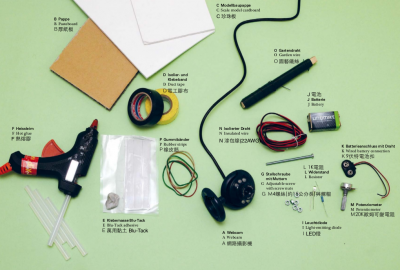
用意するものリスト
材料
- 1 ウェブカメラ
- 厚めのダンボール / 工作用 木材 20 x 30 cm
- スチレンボード 20 x 30 cm
- M4 ネジ 長さ約 15 mm とボルト
- ダクトテープ
- 粘着ゴム
- ホットメルトグルーガン用のグルーステイック
- 輪ゴム
道具
- カッター
- ねじ回し
- ホットメルトグルーガン
- (オプション) はんだごて
オプション、外部LED照明光源
- 1 スイッチ
- 1 白 LED
- 1 電池 (9V)
- 1 ケーブル付き バッテリーホルダー
- 1 抵抗 レジスタ (1 k Ω )
- 1 ポテンショメーター (20 k Ω )
- 30 cm 絶縁線
- 針金
顕微鏡分析、微生物観察 用具
- 透明なプラスチックカップ
- スライドガラス
- ペトリ皿 プラスチック、又はガラス
- ピペット
- 油性ペン
- 小さじ
- ピンセット
- サンプル用小さいプラスチック容器
1. ウェブカメラの改造 パートA: 小さい世界の拡大
- 市販のウェブカメラの色々。レンズのマニュアルフォーカスできるウェブカメラモデルがDIY顕微鏡用に適している。 トライアンドエラーで好きなモデルを決めよう。
- ウェブカメラの改造前にコンピューターに繋げ、ウェブカメラが作用するかを試そう(ドライバーのインストールなど)。Windows, Mac, or Linux.
- この時点でウェブカメラを使い身の回りの世界を拡大してみる。レンズのネジを緩め、ポケットランプなどでサンプルを照らし、観察したいサンプルに近づいてみよう。
- ウェブカメラを改造しなくても肉眼で見えない世界が見えて来る。
1. ウェブカメラの改造 パートB: 顕微鏡に改造
- ウェブカメラの解体を始める。見えるねじ、そしてラベルやゴムの下に隠れているねじを全て取り除く。しっかりとした道具、例えばねじ回し、スイスアーミーナイフ(写真)でウェブカメラのカバー本体をこじ開ける。
- ウェブカメラ内部:カメラの眼になるセンサー、エレクトロニクスのスイッチ。照明用LEDは別に後から取り付けるので元のLEDは必要ない。
- レンスは接着剤で取り付けてあるので、気をつけてエレクトロニクスから取り外す。レンズの外側に付いている輪カバー(写真右)は使わない。
- カッターなどを使い、銅線、USBケーブルは切らないで残しカメラ後ろのプラスチックケースを取り除く。エレクトロニクス、ケーブル全てが放たれる。
- ウェブカメラ内部:写真左に見える内臓マイクは必要ない。
- レンズを逆さまに取り付ける。正しい方向と違い、ねじで取り付けることはできないので、光を通さないダクトテープなどでしっかりと取り付ける。
- 正しく取り付けられたかを試すために、改造したウェブカメラをUSBケーブルでコンピューターにつなぎ、レンズをコンピュータースクリーンに向け、スクリーンを観察する。スクリーンのRGBピクセルが見える。
2. スタンドの工作
- 土台。粘着粘土などを使い、ウェブカメラをプラットフォームとなる 15 x 15 cm 程の段ボールなどの土台に配置する。
- スタンドの壁を作る。スチレンボード、工作紙などを使い、レンズの高さを壁に記し、工作紙をこの高さで切り取り、壁をホットグルーで取り付ける。
- スライドを置く台。カッターを使い、別なスチレンボードにレンズが見えるサイズの窓を切り取る。これもホットグルーで壁に取り付ける。
- 焦点を合わせるためのダイアル。ダイアル用のねじのために穴をあける。ねじにあったサイズのナットを穴の上にホットグルーで取り付ける。ねじは土台まで届く長さを使う。
- プラットフォームの安定。土台に足を付け、輪ゴムで土台とスライド台を安定させる。ねじを回すことでスライド台を数ミリ単位で上下に動かすことができる。
3. 照明
- 顕微鏡工作のために使ったウェブカメラにLEDが付いていない場合でも照明は簡単に付け足せる。
- LEDに銅線をつなげる。はんだで取り付ける方が安全。In this easy way, the wires can be twisted together. But it is safer if they are solded on.
- The centimeters long feed of our light source is wrapped with garden wire. The wire thus becomes pliable and later can be attached in any position.
- The light source, potentiometer and battery are attached to our construction with hot glue. Our DIY MICROSCOPE is ready for use.
3.B Hacking the LEDs from the Webcam (to be documented)
- Coming soon
4. Using the Microscope and Hunting for Microorganisms
- The USB cable of the converted webcam is connected to the computer. Now we can begin with our examinations.
- The study objects are placed on a glass slide and can be shifted by hand. The microscope’s focus is regulated by the adjustable screw.
- As with a professional microscope, with our DIY tool we are able to take electronic photos and even films. Photos and films are digitally available, can be further processed and of course be easily published on the Internet.


